Showing posts with label Campaign: Paradiso. Show all posts

May 28, 2014

Infinity: Tohaa Hatail Spec-Ops

Over on MayaCast*, we are running a little Infinity painting contest. Just a single figure, nothing fancy, winner gets an Infinity boxed set. We just wanted to encourage everyone to get another figure painted up this month for their army, so we decided the hosts better participate, too! This is what I got done.


This is the Hatail Spec-Ops model of the Tohaa faction for Infinity: The Game. Spec-Ops can represent any of your basic troop types, are packaged with a variety of extra weapons, and in Campaign: Paradiso they can use Objective Points to increase their stats as well as buy new equipment and skills.


I have named this one Leeam Neesaan (which is kinda funny if you are familiar with Tohaa names), but he died in our Campaign, so now he is Leeam Neesan Ahl-so.


There the two Spec-Ops models pose together: Leeam Neesan and Aelis Keesan. Then the whole family of Tohaa so far.

*MayaCast is the Infinity podcast that I host with Kip Parcell, in case you didn't know. If this is the first you're hearing of it, we sure would appreciate your "Like" on our Facebook page, and even if you don't listen, we will happily accept your download of the monthly shows. Or subscribe to the RSS Feed.

May 15, 2014

Executive VIP

This civilian miniature can be found in the Dire Foes Mission Pack #4 - Flee or Die that features Indigo Brother Konstantinos vs Hassassin Husam Yasbir. I needed a civvie model for our next Infinity mission, so got this one painted up.


The jacket, skirt, and stockings were painted Black, VMC Black Grey, VMC Neutral Grey, and VMC Light Grey. The stockings were then glazed with VMC Smoke.


The blue-white was painted GW Ice Blue (VGC Glacier Blue), then shaded with VMC Turquoise and highlighted with P3 Frostbite and White. Lined with VMC Dark Prussian Blue.


The base was VMC Mahogany Brown, VMC Orange Brown, GW Vomit Brown (VGC Filthy Brown), VMC Ice Yellow (very small highlights), VMC Hull Red (lining and shading).


May 2, 2014

Paradiso Jungle Table

For the Paradiso Jungle table, I made a 4'x4' surface that can be placed atop any flat surface (such as the dining room table, a card table, the breakfast nook table (which is what *I* use it for...)).

Home Depot (or maybe it was Lowe's... any DIY store) had 1/2" thick chipboard in 2'x4' sheets.  That would be perfect - easy to carry and store, two next to each other make a perfect 4'x4' board.  I didn't want them shifting during game play, so I inserted some leftover Ikea furniture dowels into one side, and corresponding holes into the other half of the board to keep things together during the game.

Measure twice, drill once...
Step one was to prime both sides of the chipboard (to help against warping) with black primer. I used household interior/exterior latex primer.


Since this was going on top of the breakfast table, which is a bar-height piece of furniture my wife is WAY more fond of than she is of game tables, I helped out by outfitting the bottom of the sections with padded feet so that they would not damage any surface they are put on.  These self-adhesive, padded feet are sold for people who want to easily move their heavy furniture around hardwood floors, and are found at any hardware store or Target/WalMart-type store.


To finish the playing surface, I chose a time-efficient and aesthetically pleasing Easy Button - Rust-oleum Textured Spray Paint, Deep Forest.


I thought, once sprayed, it would look a whole lot like grass or undergrowth, so that once I plopped all the plants and buildings down on it, it would look like a proper jungle.


As I applied multiple coats, I noticed that as my spray lingered in an area, it would gradually become lighter in color, allowing a subtle variation in tone across the entire board.  I sealed the textured spray paint with several coats of matte spray varnish.

(Those of you following this blog from its inception may feel that all of this has been very familiar...)


Combined with the Jungle Buildings and Jungle Plants, the table is a great start to infinite Infinity adventures on Paradiso.


May 1, 2014

Cheapa$$ Jungle buildings Painted

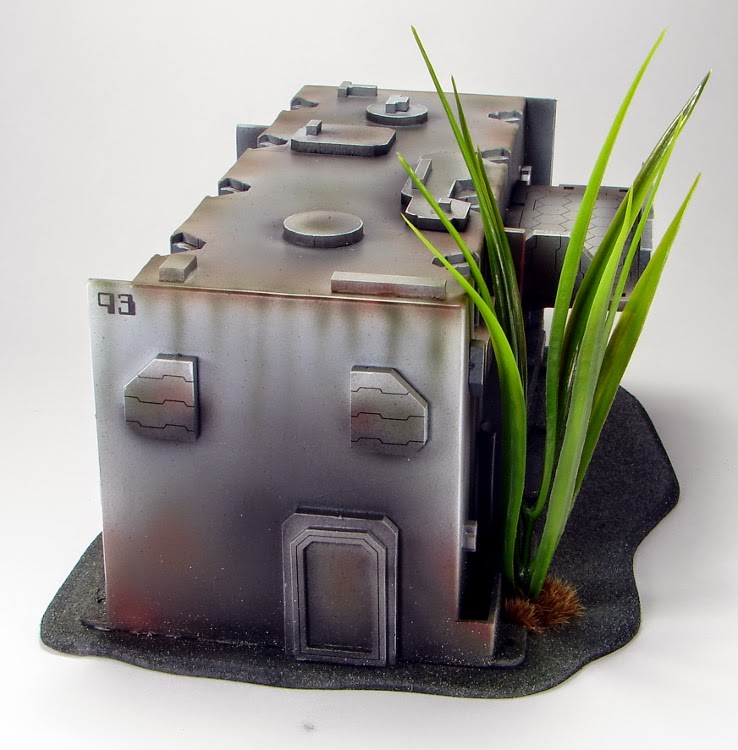
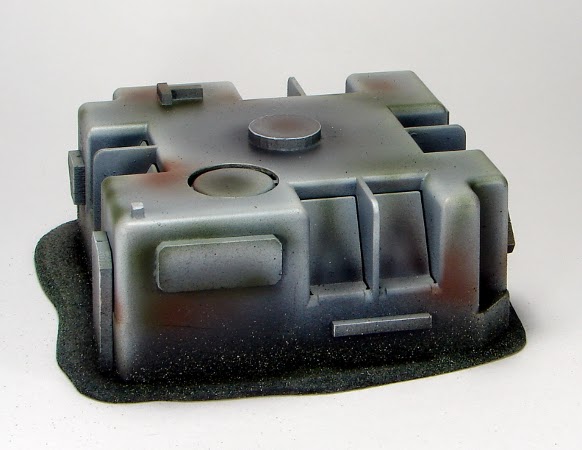
I painted up the electrical box buildings that I had built for the Jungle/Paradiso campaign table.


I primed them black all over, and then primed the top 75% or so with grey primer.


Then I airbrushed highlights with Vallejo Model Colour Light Grey and then Silver Grey (that's not a metallic color... relax...).


I applied shading with VMC German Grey and then Black. I lined sharp edges in white.


The tiny numerals on each building are waterslide transfers from GinFritter's Gnomish Workshop, via Armorcast.


The weathering was then applied by airbrushing VMC Flat Brown and VMC Olive Grey.


Plants were hot-glued to a couple buildings' bases, and then static grass tufts added to disguise the hot glue.


Windows were quickly rendered hand-painting the area with a solid coat of P3 Coal Black. I then airbrushed the centers with P3 Regal Blue, P3 Cygnar Highlight, and P3 Cygnar Highlight mixed with some White.


I sprayed the same speckled, textured green spray that I used for the table top and the bases of the foliage along the bases of each building. I did not wrap or mask the buildings, allowing the spray to create a natural gradient up the base of each building.


If I wanted to really go to town, I would add overgrowth growing up the sides of the buildings with lichen or coarse turf flock, glued on, sealed, and painted. But I think these will be fine as-is, with a good balance of time and money spent vs aesthetics and playability.


Their biggest downside is that you cannot move INTO them, nor play inside them - You have to go around or climb over. Building kits like those that Warsenal makes are still best for maximum playability.